
Leave Policies allow you to set the rules for how time off is managed in your workspace. They define the types of leave available — such as vacation, sick leave, or personal days—along with how leave is accrued and the conditions under which it can be taken.
By creating and applying Leave Policies, you ensure that all team members follow consistent rules, which makes managing time off simpler and more transparent for both employees and managers.
To create a Leave Policy,
- Go to Settings > Leave > Create new policy
- Fill out the following fields
- Name: Assign a name to the policy such as Vacation, Sick Leave, etc.
- Members: Select which members the policy applies to, giving you flexibility to assign different policies to different teams or roles.
- Paid or Unpaid: Decide whether the leave type is compensated or unpaid.
- Duration: Set the maximum duration for this leave type.
- Hours or Days: Choose whether the policy tracks leave in hours (useful for partial days) or full days.
- Allow negative balance: Whether members can still take leave if their balance is consumed.
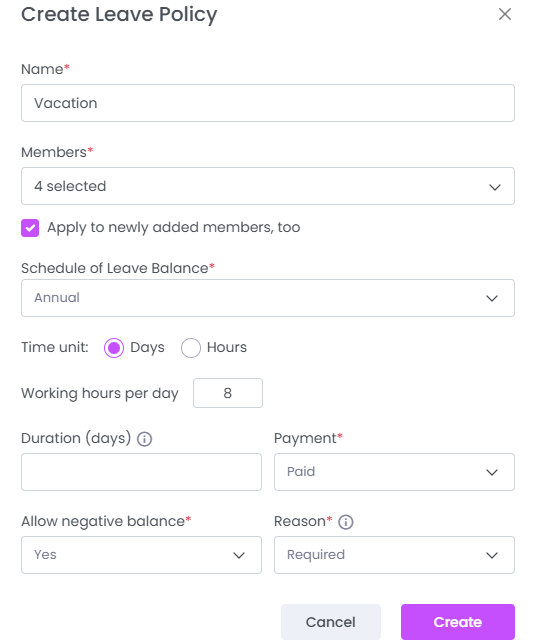
These settings allow you to tailor each policy to reflect your organization’s approach to time off. For example, you might offer paid sick leave tracked in days for all employees, while setting up unpaid personal leave tracked in hours for contractors.
With Leave Policies in place, you can:
- Standardize requests and approvals: Ensure that all leave requests are handled under the same rules.
- Promote fairness and transparency: Members clearly understand what types of leave they are entitled to and under what conditions.
- Simplify reporting and planning: Leave data is automatically reflected in your reports, helping managers plan workloads, manage payroll, and maintain accurate attendance records.
To learn more about Leave Policy settings, visit the Leave Settings article.
Workspace-wide leave settings
To change workspace-wide leave settings:
- Go to settings in the WebWork web interface.
- Click Leave on the left side of the screen.
- Go to the Workspace tab, next to Leave Policy.
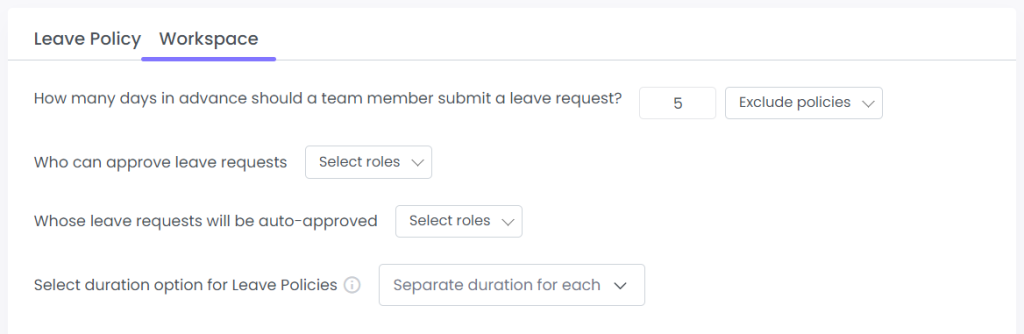
Here you can change the following settings:
- The duration of the notice period for leave requests
- Which policies don’t require a notice period
- The member types that can approve leave requests
- The member types that don’t need approval for their leave requests
- How durations are set for your leave policies
Note: if you select One duration for all next to Select duration option for Leave Policies, you will need to input the Time unit and Duration for all your leave policies. If you switch back to Separate duration for each, the durations for your added leave policies will be restored.
Multi-Level Approvals
Leave requests can go through multiple sequential approval stages instead of a single approver, with default behavior unchanged at one level unless admins opt in to add more from the leave settings page, where levels can be added, reordered, or removed. Requests move through configured levels in order, each level must approve before the request advances to the next, and the approver at the current level is notified when it’s their turn (no notification goes out to levels not yet reached). Request status stays “Pending” until every configured level has approved, and rejection at any level stops the request. This shows up on the leave settings page as a new approval-level configuration section, and on the request details page as a progress indicator showing the current level and completed levels. To enable this feature you should go to Settings, then click on Leave and Workspace:
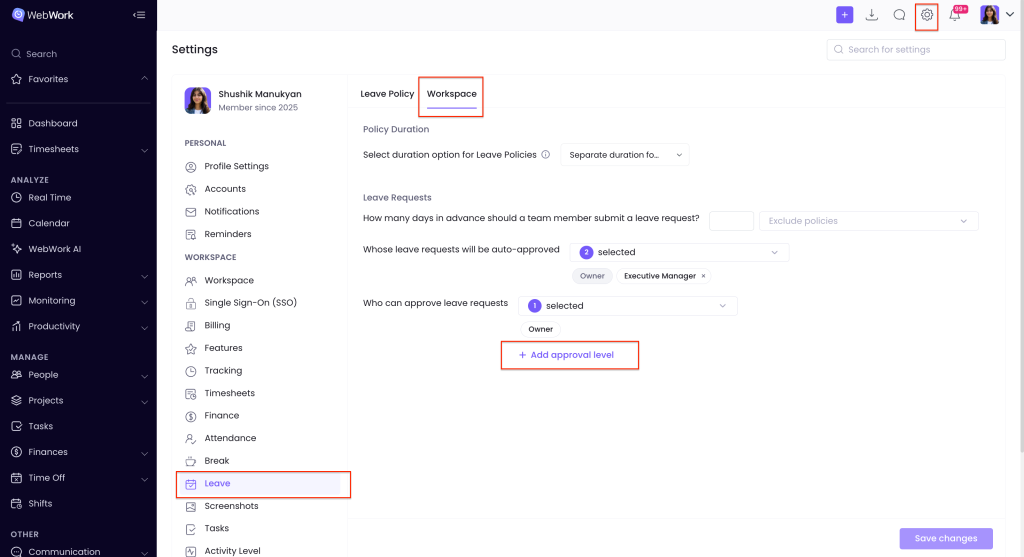
You can add up to 4 approval levels: starting from project manager and the highest level – the owner of the workspace.
Leave Schedules, Rollover, and Balance Import
Administrators can configure how leave balances are allocated throughout the year, whether unused leave carries over into the next year, and import existing leave balances from a CSV file.
These options are available when creating or editing a leave policy.
Leave balance schedule
The Schedule of Leave Balance setting determines when members receive their annual leave balance.
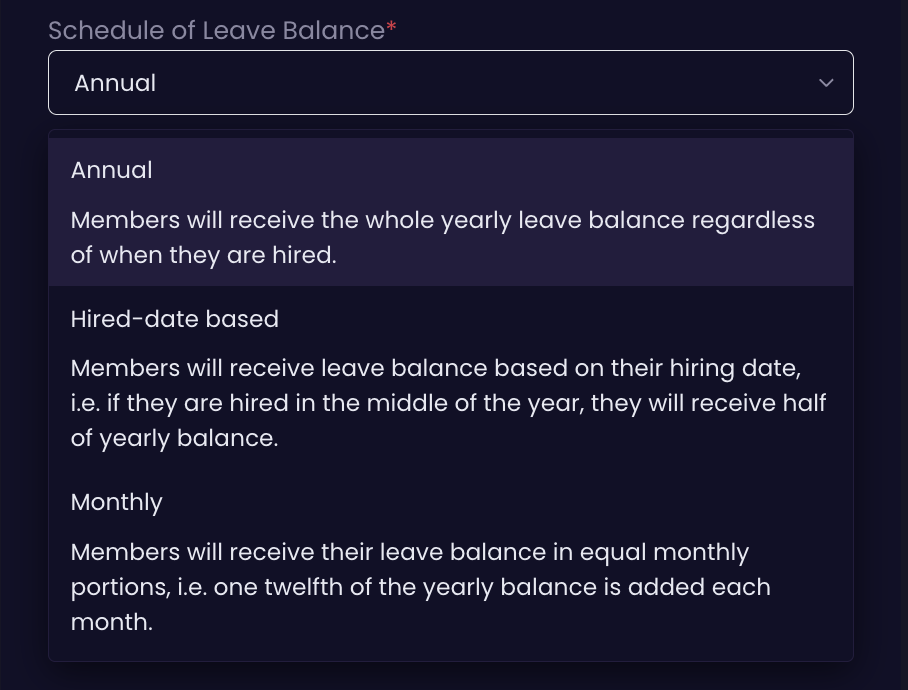
WebWork supports three schedules:
Annual
Members receive their full yearly leave balance, regardless of when they are hired.
Example:
If the annual leave balance is 24 days, a member hired in December still receives the full 24 days.
Hired-date based
Members receive a leave balance based on their hiring date. The balance is prorated according to how much of the year remains when the member joins.
Example:
If the annual balance is 24 days and a member is hired halfway through the year, they receive 12 days for that year.
Monthly
Allows leave to be accrued gradually based on the member’s time worked.
When Monthly is selected, administrators can specify the accrual amount, such as the number of leave days earned per month, and choose the accrual day. For example, with Monthly anniversary selected, the leave balance is added according to the member’s monthly employment anniversary.
Administrators can also enable Prorate first month to control how the first, partial month is handled for members who are added mid-month. When enabled, the member receives a prorated leave balance for that first month. With Monthly anniversary as the accrual day, the full monthly amount is granted right away. When disabled, the first month is skipped and leave accrual begins with the next accrual cycle.
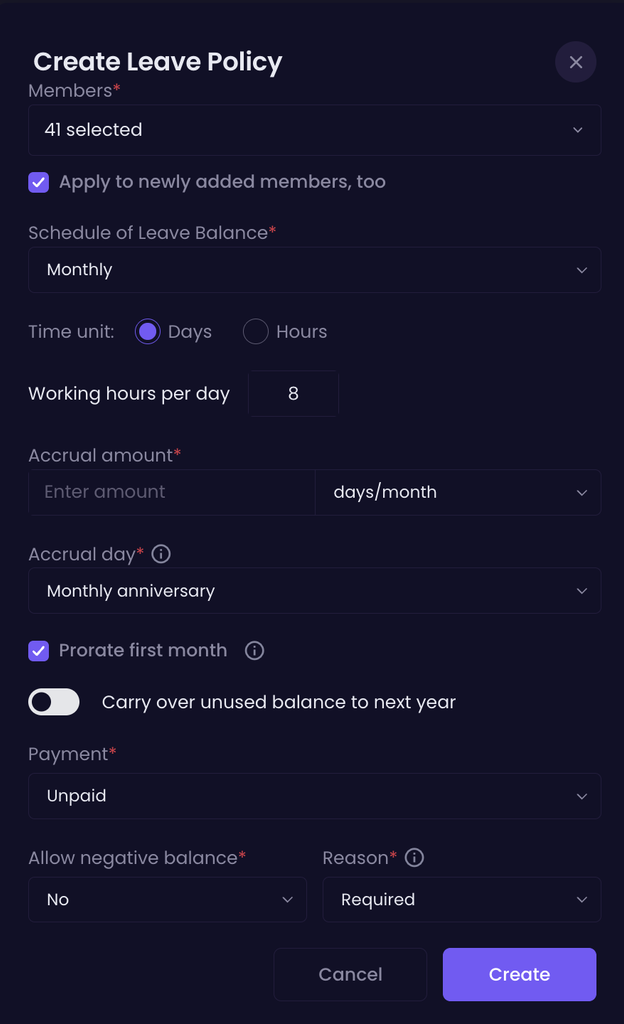
Carry over unused balance to next year
The Carry over unused balance to next year setting determines what happens to a member’s unused leave at the end of the year.

- Enabled: Any unused leave balance carries over into the next year.
- Disabled: The unused balance resets at the end of the year.
This setting is optional and can be enabled or disabled according to your organization’s leave policy.
Import leave balances
Administrators can import current leave balances from a CSV file instead of updating members’ balances manually.
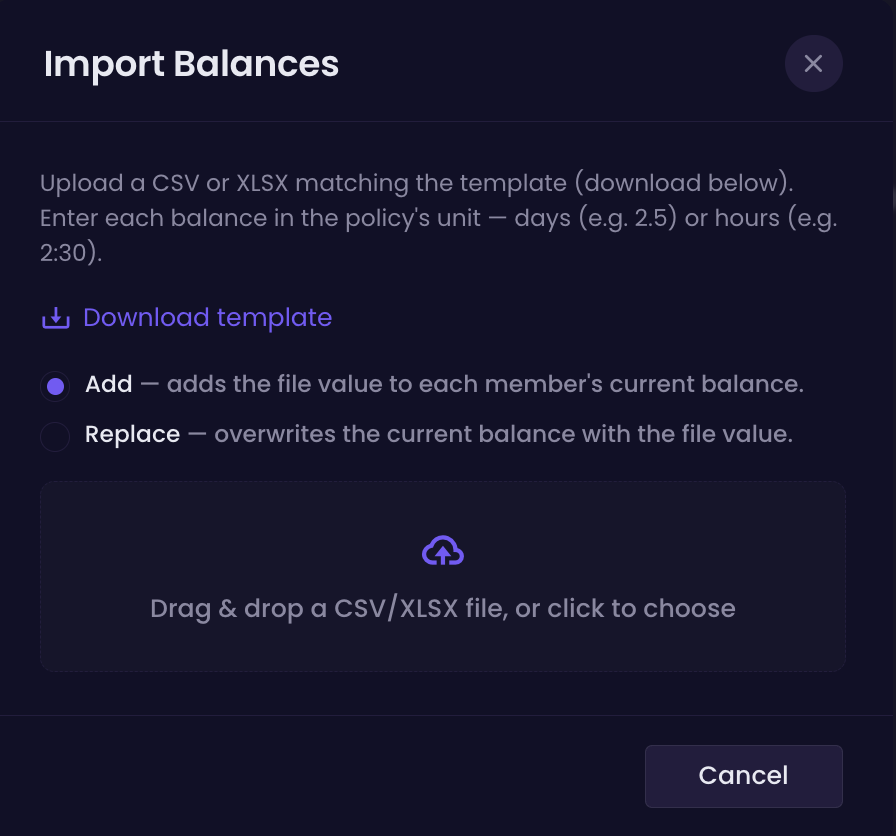
When importing a CSV file, you can choose how the imported values should be applied:
- Replace – overwrites the current balance with the file value.
- Add – adds the file value to each member’s current balance.
Review changes before importing
WebWork validates and analyzes the CSV file before making any changes.
After you upload the file, the system:
- Analyzes the CSV file.
- Identifies the changes that will be made to members’ leave balances.
- Shows a preview of the exact changes.
- Flags any issues found in the file.
- Applies the changes only after the issues are resolved and you confirm the preview.
This means an invalid or incorrectly formatted file will not overwrite existing leave balances.
Was this article helpful?
Thanks for your feedback.