
Our public API allows you to access and integrate data from our platform into your applications.
If you want to use our API, begin by reviewing it here.
To access the API, you will need the following:
- The Workspace Owner’s login information (email address)
- The token generated by the Workspace Owner in Profile Settings>API
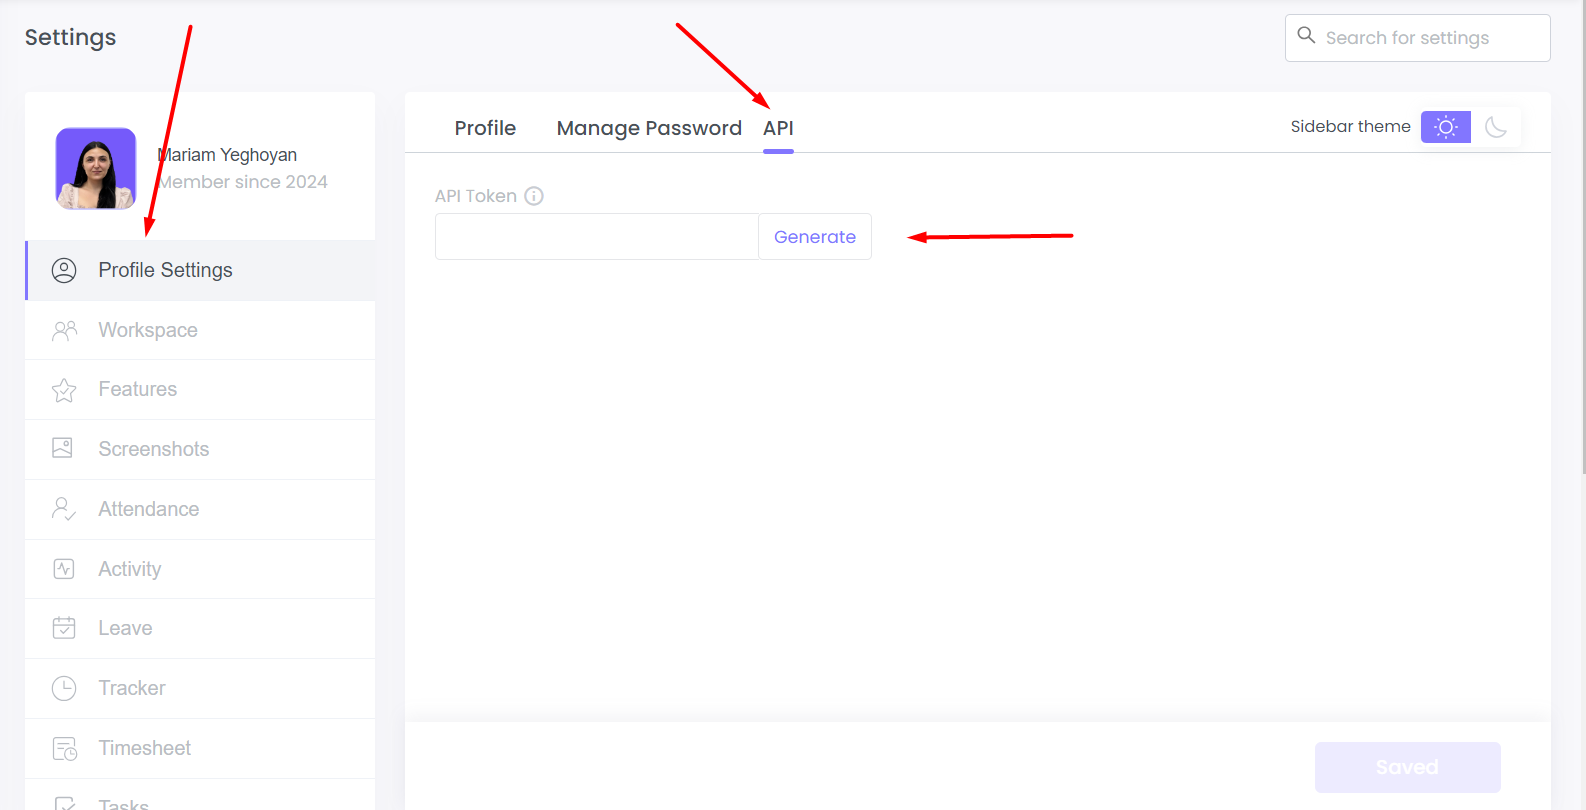
Once you have the workspace owner’s email address and the generated token, you can use these credentials to access the API and receive the data you need.
Requesting Additional Data
Our API is designed to be flexible and expandable. If you need data that isn’t currently available through our public API, we can add it for you. Here’s how to request additional data:
- Contact Support: Reach out to our support team via email or through the support portal on our website. Provide details about the data you need and how you intend to use it.
- Specify Requirements: Be as specific as possible about the data requirements. Include details such as the data fields, format, and the purpose for which you need this data.
- Implementation: Our development team will review your request. If feasible, we will add the requested data to the public API and notify you once it’s available.
Custom API is accessible only to users on our Premium plan.
Webhook support has been introduced in API v2, enabling real-time event notifications for key resources within the platform. Webhooks are now available for the following resources and events:
1. Member (invited, activated, updated, including personal details and role changes, archived, deleted)
As soon as a new member is invited, activated, archived, deleted or their personal details and roles have been updated WebWork automatically sends a webhook event to the configured external system.
- Project (created, updated, archived, deleted)
Whenever a project has been created, archived, deleted or updated WebWork automatically sends a webhook event to the configured external system.
- Contract (created, updated, deleted, paused, activated)
Whenever a contract has been created, archived, deleted or updated a webhook event is sent to the external system.
- Task (created, updated, deleted, comment updated, assignee updated)
If there had been updated on your tasks, such as updated assignee, comment, or a creation of a new task/deletion of an old one, the external system will be notified.
- Timesheet Approval (created, updated).
Whenever there are updates regarding the timesheet WebWork triggers a webhook event.
This enhancement allows seamless integration and real-time synchronization with third-party systems.
Webhooks
Webhooks let you send workspace events to your own HTTPS endpoint as they happen, instead of polling the API for changes. Each endpoint gets its own signing secret, and every delivery is signed so your receiver can verify it actually came from WebWork.
Webhooks can now be managed directly from Settings, so you no longer need to go through the API to set one up.
Who can manage webhooks: Workspace owners and executive managers can create, edit, and delete webhook endpoints.
Setting up a webhook
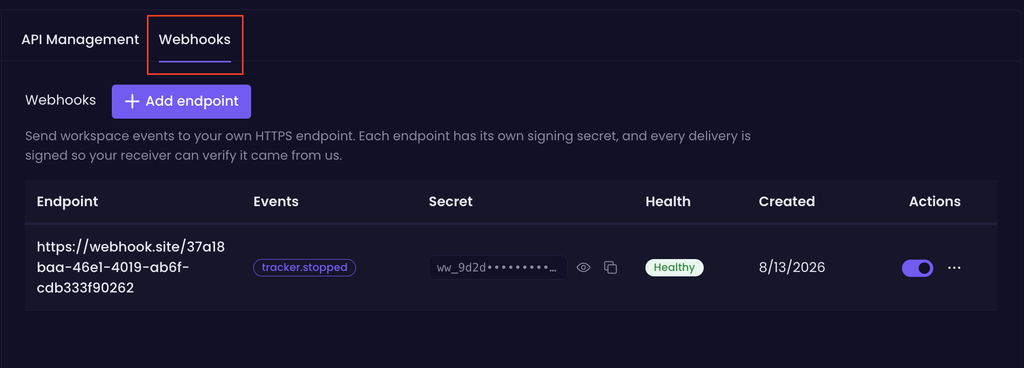
- Go to Settings → Rest API → Webhooks.
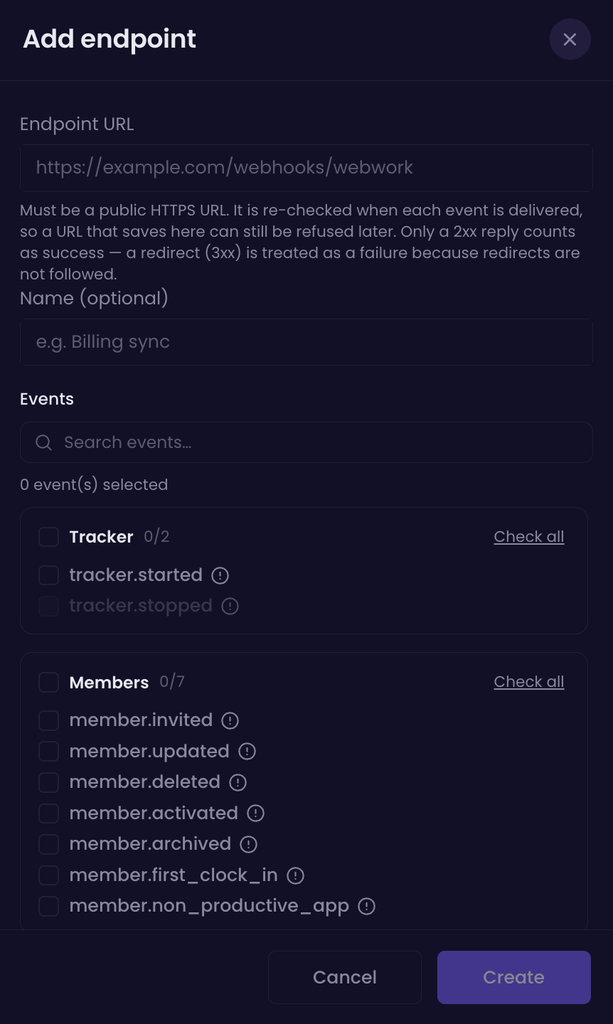
- Click Add endpoint.
- Enter your Endpoint URL — this must be a public HTTPS URL. It’s re-checked every time an event is delivered, so a URL that’s accepted when you save it can still be refused later if it stops being reachable. Only a 2xx response counts as success; a redirect (3xx) is treated as a failure, since redirects aren’t followed.
- Optionally give the endpoint a Name (e.g. “Billing sync”) to make it easier to recognize later.
- Under Events, select which event types this endpoint should receive. Events are grouped by category — for example, Tracker (
tracker.started,tracker.stopped) and Members (member.invited,member.updated,member.deleted,member.activated,member.archived,member.first_clock_in,member.non_productive_app). Use Check all to select every event in a category at once, or search for a specific event with the search box. - Click Create.
Managing existing webhooks
The Webhooks table shows all your configured endpoints, with:
- Endpoint — the URL events are sent to
- Events — which event types are subscribed on that endpoint
- Secret — the endpoint’s signing secret, partially hidden by default; use the eye icon to reveal it or the copy icon to copy it
- Health — shows Healthy when deliveries are succeeding
- Created — the date the endpoint was added
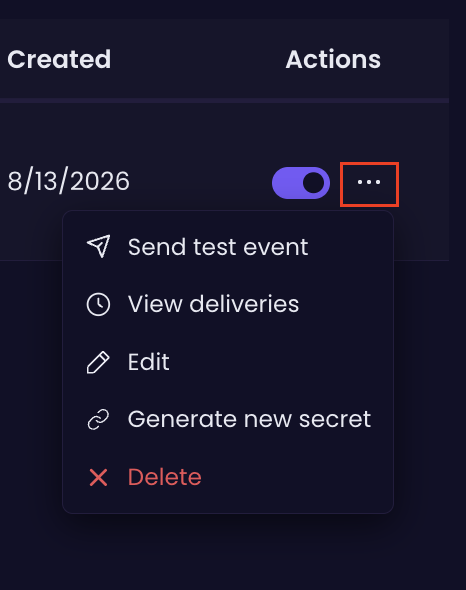
- Actions — a toggle to enable or disable the endpoint without deleting it, plus a … menu with further options:
- Send test event — fires a sample event to the endpoint so you can confirm your receiver is set up correctly
- View deliveries — shows the endpoint’s delivery history
- Edit — change the endpoint’s URL, name, or subscribed events
- Generate new secret — rotates the endpoint’s signing secret; update your receiver with the new value once you do, since the old secret stops working
- Delete — permanently removes the endpoint

Was this article helpful?
Thanks for your feedback.