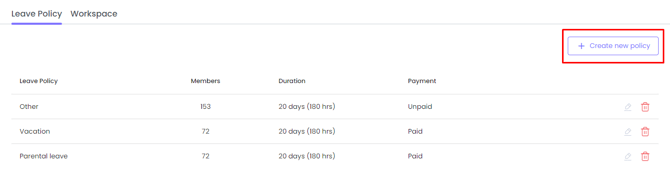
Leave Policy Tab
Leave Policy is a set of rules that you select when taking leave. Each policy consists of properties such as name, applicable members, working hours per day, leave duration, whether it is paid, allowance for negative balance, and requirement for a reason.
To create leave policies:
- Go to Settings > Leave > Create new policy
2. Fill out the details
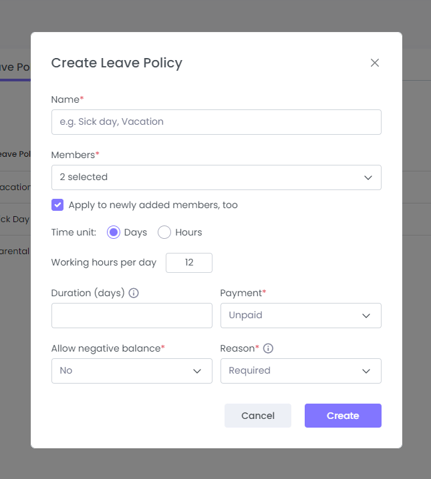
Let’s break down each property to understand what they stand for.
- Name
Give your leave policy a name, such as Vacation or Sick Days. - Members
Choose which members this policy applies to, and decide whether it should automatically apply to future members as well. - Time unit
When you select days, you’ll need to enter the policy duration in days along with the working hours per day. If you select hours, simply enter the duration in hours.
Note that you cannot edit the Time unit property after creating the policy.
- Duration
Shows how long members can take leave with this policy - Payment
Shows whether members will get paid while on leave with this policy - Allow negative balance
If set to yes, it means members can take leave days even if their leave balance is at 0. - Reason
If set to required, it means members will need to specify the reason for requesting leave.
Workspace Tab
To manage workspace-wide leave settings:
- Go to Settings > Leave > Workspace tab
In the first setting, if you select One duration for all and change the Time unit from days to hours or hours to days, the change will affect existing Leave Reports and might result in slight differences. Existing requests will maintain their units.
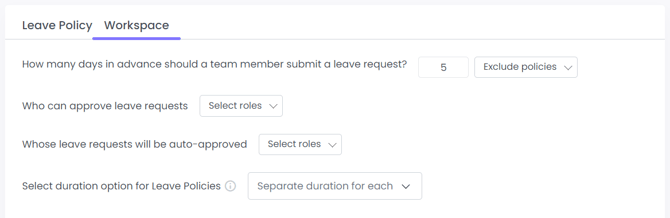
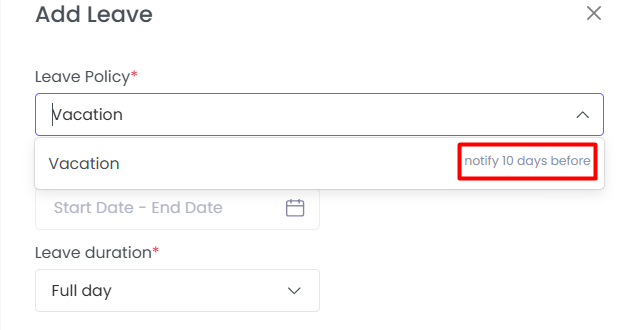
- How Many Days in Advance Should a Team Member Submit a Leave Request
Best for setting clear expectations about how early employees should request time off.
-
Defines how many days in advance leave requests should be submitted.
- This does not block requests with less notice. The pop-up simply shows the recommended number of days.
-
Example: If set to 5 days, the system will display this guidance when employees request leave.
-
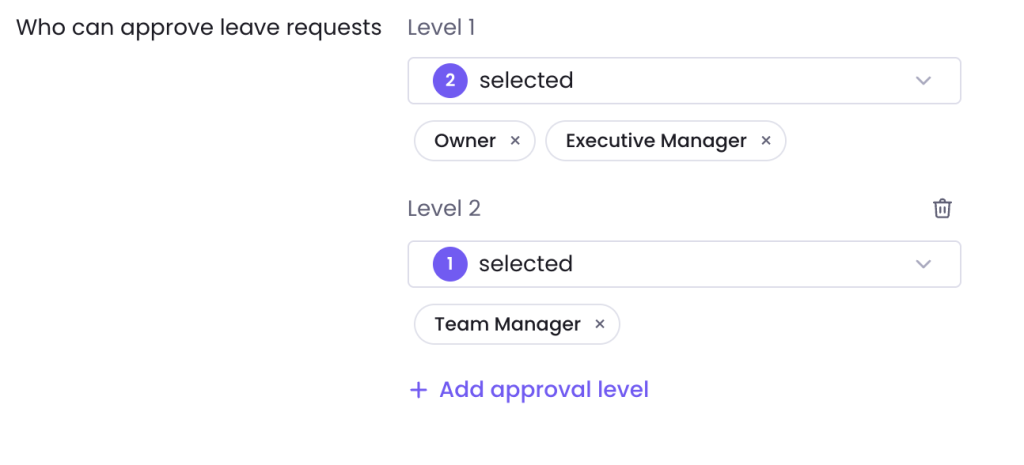
Who Can Approve Leave Requests
Helps control who in your organization is authorized to review and approve requests.-
Select which roles can approve leave (e.g., Team Leads, Managers).
Keeps the approval process consistent and prevents unauthorized approvals.
-
-
Whose Leave Requests Will Be Auto-Approved
Ideal if some roles should bypass manual approval.
-
Choose roles whose leave requests are approved automatically.
-
Example: Executives or Team Leads may have their requests auto-approved.
-
-
Select Duration Option for Leave Policies
Determines how leave allowances are structured across your workspace.
-
One for All – All leave types share a single pool of days.
-
Separate Duration for Each – Each leave type has its own allowance (e.g., 15 vacation days, 10 sick days).
-
Was this article helpful?
Thanks for your feedback.