Available on Premium plan. Only the Workspace Owner & Executive Managers can enable SSO (single sign-on).
What is SAML?
Security Assertion Markup Language (SAML) is a secure authentication standard that enables communication between an Identity Provider (IdP) and a Service Provider (SP)—such as WebWork. This guide walks you through setting up Custom SAML SSO, including WebWork’s streamlined metadata-based approach.
1. Enable custom SAML
Note that enabling Custom SAML will override any existing SSO settings.
- Go to your Workspace settings.
- Navigate to Single Sign-On (SSO).
- Select Custom SAML.
2. Choose a login policy
Define how strictly SAML authentication should be enforced for your organization by configuring it in your Identity Provider (IdP), not in WebWork.
Your IdP may offer login policy controls that determine who is required to authenticate via SAML. Common options include:
- All users must use SAML authentication
Applies to all members and guest users. - All users except guests must use SAML authentication
Only member users are required to use SAML; guests are allowed to use other login methods. - SAML authentication is optional
Users can choose between SAML and standard login methods.
Please configure your desired login enforcement policy directly within your IdP settings (e.g., Azure AD, Okta, etc.). WebWork does not control or enforce this policy—your IdP does.
3. Configure your identity provider (IdP)
Provide your IT team with the following WebWork SAML service details:
- Audience URI (SP Entity ID)
- Single Sign-On URL (ACS URL)
Note that WebWork’s SP certificate does not expire, so no certificate updates are necessary.
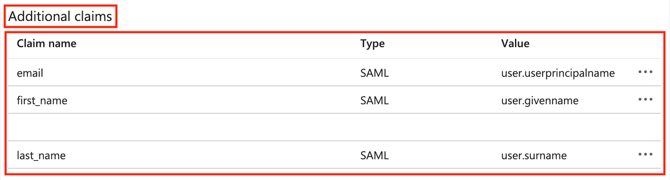
Assertion Requirements
- A unique NameID in any format is required.
- Do not use email addresses as the NameID to avoid issues if user emails change.
Attributes:
4. Use the IdP metadata URL (WebWork simplified setup)
WebWork makes SAML configuration simple by accepting your IdP Metadata URL, which auto-fills all necessary fields.
To complete setup:
- Ask your IT team for the IdP Metadata URL.
- Paste it into the SAML configuration screen in WebWork.
- Click Save Changes.
That’s it! WebWork will extract and apply the correct settings, including your IdP’s login URL and certificate.

5. Log in via SAML
After saving, you’ll be redirected to log in using your Identity Provider.
This first login will automatically link your WebWork account to the authenticated IdP user.
After successful connection, you can securely log in via SSO:
https://www.webwork-tracker.com/login/sso
Was this article helpful?
Thanks for your feedback.